
Before Starting to design RDLC report in visual studio, I prefer to do some basic setup or say prerequisite setup in visual studio. In this post, I will share my basic RDLC report setup and some report designing tips.
At the end of this:
You will able to do basic setup in visual studio report designer that is required for RDLC report development
Before we start:
We will design and upgrade reports by using the Microsoft Dynamics NAV Development Environment. The software requirements for designing and upgrading reports are as follows:
- Microsoft Report Viewer (if not already installed on target computer Microsoft Dynamics NAV setup will install during installation)
- Microsoft Visual Studio or Microsoft SQL Server Report Builder.
- Dataset in the report
Basic Setup To Create an RDLC report Layout
- Open report using Microsoft Dynamics NAV Development Environment and open layout
- Tools > Object Designer
- Report > Design
- View > layout
- Visual studio will opens and now open basic toolbar
- View > Toolbox (Ctrl + Alt + X)
- View > Properties Windows (F4)
- View > Report Data (Ctrl + Alt + D)
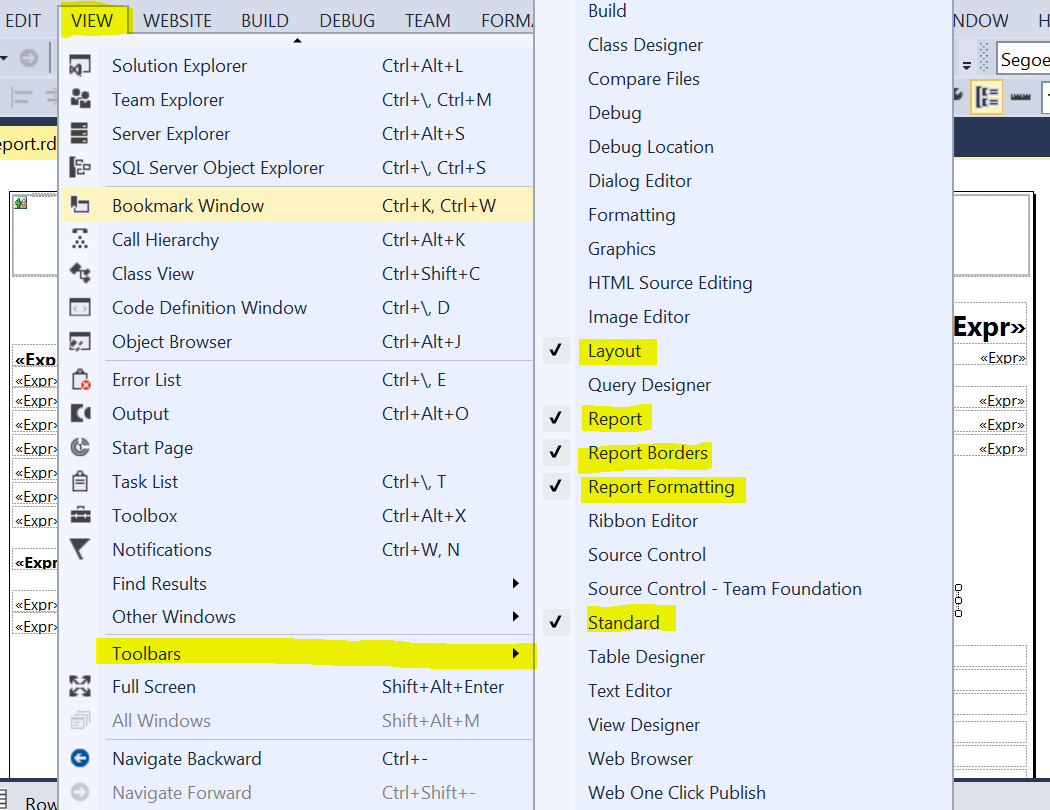
- Now let's setup toolbar
- View > Toolbars > Layout + Report + Report Borders + Report Formatting + Standard
- I usually rearrange these toolbar as shown in picture below.

Toolbar arrangement for easy report design in visual studio - Report properties setup
- Right click on report and select properties
- On properties window select page units -> centimeter/inches
- Select Orientation -> Portrait/Landscape
- Paper size/Type -> A4/Letter/other as you required
- At the beginning I always give margin of 0.4 inches on each side which I will adjust in future if required
- After this all setup done click OK

Report Properties Page setup - Font and text-box setup : Either in font toolbox in the top or in properties windows set Font as following
- FontFamily : Segoe UI
- FontSize: 8pt
- FontStyle: Normal
- FontWeight: Default
- TextDecoration: Default

Font Setting in RDLC report design in Visual studio - Also set CanGrow: False so even if text is not fit in the text box it will not grow and change design
- Padding: 0pt, 0pt, 0pt, 0pt
- TextAlign: Right
- Text-box Size:
- Width: depends
- Height: 0.16654in ~ 0.2in

Text-box size and padding setting in report design in visual studio
 |
| Report Data Toolbox |
 |
| Toolbar setup in report design setup in visual studio |


TIPS for Report Design:
- Data remine less report perform best so when designing data-set always try to get exact data you need, do not filter data in report
- Make report body width less than actual report width.
we setup report width to 8.5inch and set margin to 0.4inch in left and right both side then report body width should be less than 8.5 - 0.4 - 0.4 = 7.7 inch - Try to make proper alignment of text box so report looks beautiful.
- Zoom the windows to 400% and see if there is unnoticed horizontal or vertical gap between text-boxes and also you can use background color to check if the there is some thing missing in report design.
Post a Comment
Post a Comment
Thank you for comment, I really appreciate your view.